

One of the best parts of decorating for Thanksgiving is involving the little ones in the process! Here are some easy and fun Thanksgiving decorations that your children will love making.
Paper Plate Turkey
Thanksgiving is a time for family, friends, and, of course, food! One of the best parts of the holiday is getting to decorate your home with all sorts of festive decorations. If you’re looking for some Thanksgiving decorations that your kids can help make, look no further than the paper plate turkey craft! It’s a perfect project for little ones, and it’s sure to add some holiday cheer to your home.
Making a paper plate turkey is a fun and easy Thanksgiving craft for kids. All you need is a paper plate, some construction paper, and some glue.
To start, trace your child’s hand on the construction paper. Cut out the handprints and glue them to the back of the paper plate. These will be the turkey’s feathers.
Next, cut a small circle out of construction paper and glue it to the front of the paper plate. This will be the turkey’s head.
Finally, add any other details you want, such as eyes, a beak, or a wattle. Your child’s paper plate turkey is now complete!
Handprint Turkey
This simple project is perfect for little ones, and it’s a great way to decorate for the holiday. Here’s what you’ll need:
-Construction paper in various colors
-Scissors
-Glue
-Markers or crayons
First, trace your child’s handprints on the construction paper.
Then, cut out the handprints and glue them onto a piece of paper to create the turkey’s body.
Next, add feathers by cutting out small triangles from the construction paper.
Once the feathers are glued on, use markers or crayons to add eyes, a beak, and a wattle.
Finally, write your child’s name and the year on the turkey – this will make it an extra special keepsake!
Popsicle Stick Turkey
If you’re looking for something to keep the kids occupied during Thanksgiving dinner prep, look no further than this popsicle stick turkey craft. It’s easy, cheap, and most importantly, cute! So gather up some supplies and get crafting!
This project is simple and can be done with just a few materials. All you need are some popsicle sticks, glue, paint, and googly eyes. Once you have your supplies, follow these easy steps:
1. Begin by painting your popsicle sticks. You can use any colors you like, but traditional Thanksgiving colors like brown, orange, and red would work well.
2. Once the paint is dry, glue the sticks together in the shape of a turkey. You can use as many or as few sticks as you like depending on the size of the turkey you want to make.
3. Glue on some googly eyes and add any other details you like, such as a beak or wattle made from construction paper.
4. Let your turkey dry and then display it proudly!
Cupcake Liner Turkey
This craft is super simple and only requires a few materials. All you need is some cupcake liners, construction paper, scissors, glue, and googly eyes. Once you have all of your materials gathered, just follow these easy steps.
1. First, cut out a turkey body shape from your construction paper. You can freehand this or use a template.
2. Next, glue the cupcake liners onto the turkey body. Overlap them slightly to create feathers.
3. Once the feathers are in place, add some googly eyes to your turkey.
4. Finally, cut out a beak and wattle (the red fleshy part under a turkey’s chin) from construction paper and glue them onto your turkey’s face.
And that’s it! Your cupcake liner turkey is now complete. Hang the turkey up on the fridge or give it as a sweet Thanksgiving gift!
Construction Paper Turkey
Looking for a fun and easy Thanksgiving craft for your kids? Look no further than this construction paper turkey! This cute little turkey is perfect for decorating your home or office for the holiday, and best of all, it’s simple enough for even the youngest of crafters to make. All you need is some construction paper, a glue stick, and some scissors.
To start, cut out two large oval shapes from the construction paper. These will be the turkey’s body. Then, cut out two smaller ovals for the head and neck. You can also add a beak and wattle if you like.
Next, it’s time to start gluing! Glue the smaller ovals onto the larger ones to create the body and head. Then, add any other details you like, such as feathers or googly eyes. Once everything is glued down, your Turkey is finished!
Display your Turkey proudly and enjoy your handiwork!
Start Crafting!
These Thanksgiving decorations are perfect for children to make. They are all easy to do and only require a few materials. Best of all, they can be used year after year. So get the kids involved in your holiday decorating this year with these fun and festive projects.
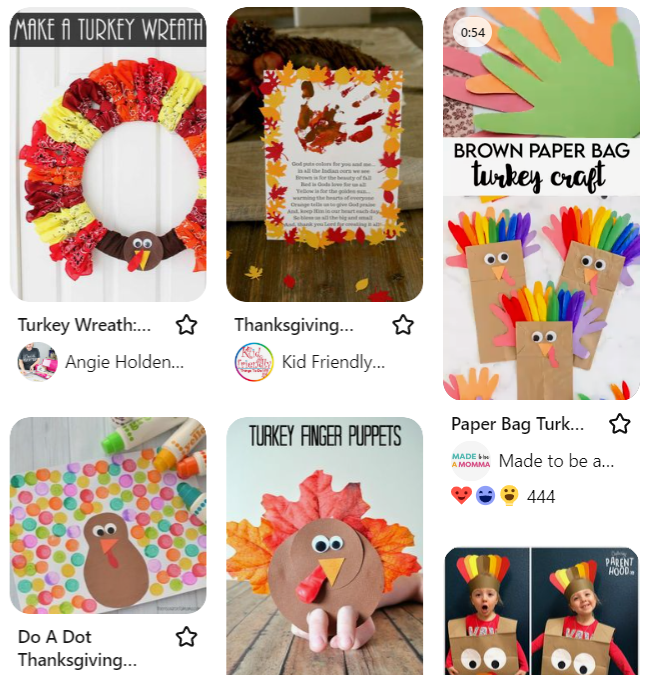
For more fun ideas check out our Thanksgiving Crafts board on Pinterest!

Leave a comment